December 3, 2012

Aryaan Hafizh dalam kenangan...

365 hari sebelum ini,
tepat waktu begini,
dia lahir ke dunia.

Ye, tepat waktu inilah...

Puji Tuhan, segalanya mudah.

Hari pertama dia bumi ini,
hujan lebat petir iringnya pulang ke rumah,
biar hujan bertimpa di luar,
kami gembira menikmati kehadirannya,
kongsi kehangatan kasih cinta.

Enam purnama bagai sekelip mata.
Rasa tak puas memeluk cium anakanda,
dia kembali ke asalnya.

Perit jiwa, tersentuh tercarik,
melihat tubuh kaku itu,
namun kesabaran mengatasi,
Bunda rela anakanda pergi,
Bunda tak kehilangan, kerna Bunda tahu ke mana anakanda pergi...

Puji Tuhan, segalanya mudah.

Hari ini, waktu ini,
cukup setahun Bunda digelar bunda,
Daddy digelar ayahanda,
Aryaan Hafizh, putra tercinta.
Dalam bayangan Bunda,
Aryaan pandai duduk dan cari tangan Bunda,
pegang.
Aryaan merangkak ikut Bunda ke dapur, ke bilik.
Aryaan pandai melambai pada Daddy bila dibawa Bunda pergi,
tiap pagi.
Dalam bayangan Bunda,
sentiasa.

Aryaan Hafizh,
Semoga kita bertemu di sana...

Buat kanda--
Di atas kita-- Tuhan,
Di bawah kita,
Aryaan dan adik-adiknya.

Puji Tuhan,
Moga semuanya dimudahkan...
Amen.

::meandmyhands::
Aryaan Hafizh, 365
03.12.2012
2357hrs

November 28, 2012

Teaser01


November 27, 2012

That English Themed Wedding

I just finished my latest Wedding Guest Book, ordered by B2B from Kajang 2 weeks ago. She asked for English theme, dusty pink shades. And the design of the cover and first page was inspired by herself.

And honestly, this would be one of my favorite. I used Layla and Mini Leli on this one, but I altered them a little bit. Instead of putting those shining brooches and small beads on both respectively, I put pearl beads.

I was really hoping that the colors of chiffon that I used suit the theme. The B2B provided me strips of ribbons she used for her wedding just to guide me for the theme color, but it was hard to find the same ones for the chiffon.

I have to admit, 2 weeks was too short for me to finish this, but finally I'm really happy that I manage to make it done and send the book to her yesterday. I hope she'll love it and enjoy her wedding fabulously. And thanks to Allah to make it happen and thanks to Imran for supporting me, like always!


Assorted shades of dusty pink chiffon that I'd bought. Nice!


The girl also ordered this simple signboard. Lovely!


Fin. And now I can sit and relax and enjoy the sunshine and rain!
Have a fabulous day, people!


November 22, 2012

Bookoos!

Mini Notebook in the making.
In fact, I'm making more books recently-- as a birthday gift for some friends and family members.
Also, wedding guest books for a few new friends.
And, we (Imran and me) are looking forward to join any arts/craft-selling bazaar-- to learn, explore and expand.
May Allah bless us in this. Amen.


November 1, 2012

It's November.

                                                                       hello.
                                                                       it's november.
                                                                       and it's raining.
                                                                       and i love november and rain.
                                                                       always.
i'm a november girl, remember?
                                                             be nice please.
                                                                    thank you.


October 29, 2012

Street Hawker

Darn!
This is the best cendol and kuey tiow soup I've ever had.
At Sri Gombak town, memang makan tepi longkang punya. Ha-ha!
The soup-- quite thick and spicy. And the cendol....


Burps And Giggles

Salam and Hello!
Terjebak dengan beberapa blogger yang pernah ke Ipoh and posted out about this cozy restaurant, so Imran and me went to the place when we were in Ipoh last weekend for Hari Raya Qurban. Just want to see how unique is the place and... RUSTIC!

I never know there is such a restaurant in Ipoh (ironically, I'm from Ipoh!).

Gila, bangunan lama di pekan lama Ipoh ni, diubahsuai dan dijadikan restoran yang menarik-- rasanya macam tak banyak ubahsuai yang the owner buat. Sebab, kalau tengok luar dan dalam bangunan, macam kedai tinggal pun ada. Hehe!

Located at Jalan Sultan Yussuf, near the HSBC, this restaurant serves foods such as burgers, wraps, pastries, tartlets, etc, coffee and tea and such (and they do have a bar) :P

We had our second breakfast there-- (before that we had our breakfast at the food court near the Stadium Perak). Such a rustic yet cozy place, they have 3 different concepts of dining space. Ada yang ala-ala cafe gitu, the bar and the one which is at the back of the building-- they call it Lazy Lane. Nice!

The owner's son said this is his mom's second project after the Indulgence Restaurant and Living-- located at Jalan Tambun (err... never been there. Hihi!)

The upper level of the shop is the space they open for charity program, bazaar and markets-- all for charity! And I missed the craft bazaar they held on Sunday.

Well, we like the concept. Really! The interior, the foods-- this is the concept of cafe that I'd planned for so long before I met Imran. (dan itu salah satu perkara yang membuatkan saya dan Imran menemui titik persamaan yang membuahkan suka dan cinta-- wahahahaha!)

Ok, we'd like to have one like this soon! :)


Till then!
Ta-ta!


October 11, 2012

Mason Jar Project 01

Packing tape sticker for the mason jar.
Can be used as a candle holder, guest book table setting decoration or centerpiece on your wedding party!


Packing Tape Photo Transfer

Salam and Hello.
As I promised, here is the tutorial for another technique of photo transferring using a packing tape. Before you do this, you need to print your image off of the laser printer, not an ink jet printer, on a piece of photocopy paper. It won't work from an ink jet prints.


Supplies needed are: Packing tape (any size, depends on your image size), image that you want to transfer, scissor, bowl of water, paper towel and mod podge (optional).

Step 1: Choose you image required to transfer.

Step 2: Carefully cover the printed image with a piece of packing tape. Avoid wrinkles or bubbles under the tape.
 
Step 3: Make sure it covers the whole image.

Step 4: I used spoon to burnish the surface of the tape to ensure the ink and the adhesive are completely in-contact. You also can use bone folder to do this.

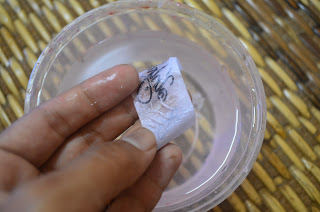
Step 5: Cut the image with scissor (or just simply tear away the edge of the tape) then submerge it into a bowl of water for a few minutes until the paper is thoroughly saturated.

Step 6: Now you can start to rub the paper until it is completely peeled off the tape. Then what left will be the tape and the image.

Step 7: When the tape is completely clean from the paper residues, let it dry on the paper towel.

Step 8: The tape will still be slightly sticky, so you can layer your image over you work (canvas, cards, patterned paper, glass, etc) or if it doesn't stick, you can use glue. Mod-podge or gel medium would be better as they become transparent when dry.

Step 9: Now it is done!


Enjoy!
Ta-ta!