Salam and Hello.
As I promised, here is the tutorial for another technique of photo transferring using a packing tape. Before you do this, you need to print your image off of the laser printer, not an ink jet printer, on a piece of photocopy paper. It won't work from an ink jet prints.
 |
| Supplies needed are: Packing tape (any size, depends on your image size), image that you want to transfer, scissor, bowl of water, paper towel and mod podge (optional). |
 |
| Step 1: Choose you image required to transfer. |
 |
| Step 2: Carefully cover the printed image with a piece of packing tape. Avoid wrinkles or bubbles under the tape. |
 |
| Step 3: Make sure it covers the whole image. |
 |
| Step 4: I used spoon to burnish the surface of the tape to ensure the ink and the adhesive are completely in-contact. You also can use bone folder to do this. |
 |
| Step 5: Cut the image with scissor (or just simply tear away the edge of the tape) then submerge it into a bowl of water for a few minutes until the paper is thoroughly saturated. |
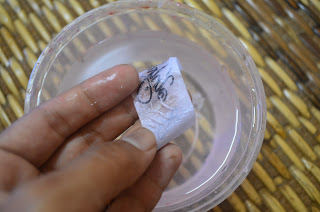 |
| Step 6: Now you can start to rub the paper until it is completely peeled off the tape. Then what left will be the tape and the image. |
 |
| Step 7: When the tape is completely clean from the paper residues, let it dry on the paper towel. |
 |
| Step 8: The tape will still be slightly sticky, so you can layer your image over you work (canvas, cards, patterned paper, glass, etc) or if it doesn't stick, you can use glue. Mod-podge or gel medium would be better as they become transparent when dry. |
 |
| Step 9: Now it is done! |
Enjoy!
Ta-ta!


1 comment:
Very nice use of Packing tape
Post a Comment