October 29, 2012

Street Hawker

Darn!
This is the best cendol and kuey tiow soup I've ever had.
At Sri Gombak town, memang makan tepi longkang punya. Ha-ha!
The soup-- quite thick and spicy. And the cendol....


Burps And Giggles

Salam and Hello!
Terjebak dengan beberapa blogger yang pernah ke Ipoh and posted out about this cozy restaurant, so Imran and me went to the place when we were in Ipoh last weekend for Hari Raya Qurban. Just want to see how unique is the place and... RUSTIC!

I never know there is such a restaurant in Ipoh (ironically, I'm from Ipoh!).

Gila, bangunan lama di pekan lama Ipoh ni, diubahsuai dan dijadikan restoran yang menarik-- rasanya macam tak banyak ubahsuai yang the owner buat. Sebab, kalau tengok luar dan dalam bangunan, macam kedai tinggal pun ada. Hehe!

Located at Jalan Sultan Yussuf, near the HSBC, this restaurant serves foods such as burgers, wraps, pastries, tartlets, etc, coffee and tea and such (and they do have a bar) :P

We had our second breakfast there-- (before that we had our breakfast at the food court near the Stadium Perak). Such a rustic yet cozy place, they have 3 different concepts of dining space. Ada yang ala-ala cafe gitu, the bar and the one which is at the back of the building-- they call it Lazy Lane. Nice!

The owner's son said this is his mom's second project after the Indulgence Restaurant and Living-- located at Jalan Tambun (err... never been there. Hihi!)

The upper level of the shop is the space they open for charity program, bazaar and markets-- all for charity! And I missed the craft bazaar they held on Sunday.

Well, we like the concept. Really! The interior, the foods-- this is the concept of cafe that I'd planned for so long before I met Imran. (dan itu salah satu perkara yang membuatkan saya dan Imran menemui titik persamaan yang membuahkan suka dan cinta-- wahahahaha!)

Ok, we'd like to have one like this soon! :)


Till then!
Ta-ta!


October 11, 2012

Mason Jar Project 01

Packing tape sticker for the mason jar.
Can be used as a candle holder, guest book table setting decoration or centerpiece on your wedding party!


Packing Tape Photo Transfer

Salam and Hello.
As I promised, here is the tutorial for another technique of photo transferring using a packing tape. Before you do this, you need to print your image off of the laser printer, not an ink jet printer, on a piece of photocopy paper. It won't work from an ink jet prints.


Supplies needed are: Packing tape (any size, depends on your image size), image that you want to transfer, scissor, bowl of water, paper towel and mod podge (optional).

Step 1: Choose you image required to transfer.

Step 2: Carefully cover the printed image with a piece of packing tape. Avoid wrinkles or bubbles under the tape.
 
Step 3: Make sure it covers the whole image.

Step 4: I used spoon to burnish the surface of the tape to ensure the ink and the adhesive are completely in-contact. You also can use bone folder to do this.

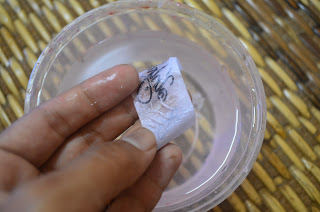
Step 5: Cut the image with scissor (or just simply tear away the edge of the tape) then submerge it into a bowl of water for a few minutes until the paper is thoroughly saturated.

Step 6: Now you can start to rub the paper until it is completely peeled off the tape. Then what left will be the tape and the image.

Step 7: When the tape is completely clean from the paper residues, let it dry on the paper towel.

Step 8: The tape will still be slightly sticky, so you can layer your image over you work (canvas, cards, patterned paper, glass, etc) or if it doesn't stick, you can use glue. Mod-podge or gel medium would be better as they become transparent when dry.

Step 9: Now it is done!


Enjoy!
Ta-ta!


You Are Loved!

 Another Mod-Podge photo transfer on canvas. I know I'm not good in scrap-booking, the template is very simple. But I think it's pretty enough to be as a birthday gift.

A simple birthday gift for my SIL, since she asked me to make her an altered canvas with her picture and Aryaan Hafizh, our beloved baby boy.


See the words "Sunshine & Rain"? That's is another technique of photo transferring using a packing tape. It's very easy, I'll post a tutorial later.

Till then.
Ta-ta!


October 3, 2012

Hey, Mini!

Mini Leli brooches in 4 colors.


First, ever!

Salam and Hello.
I am so, so, so happy when I managed to finish my very first handmade Wedding Guest Book ordered by a friend in Shah Alam. She was asking me to make a guest book with red and white theme and black cover. I was so excited and took this as my new challenge as to improve my creativity. So I decided to use velvet for the cover and Japanese stab for binding.

It's a very simple layout with red felt flowers and brooches and some silver filigrees. And not to forget, the signage and 2 altered mason jar with paper doilies and chiffon flower, I made as the table setting deco.


Owh, by the way, the signage-- it is not a chalkboard, even if it looks like one (I couldn't find one at the nearest store that time). So, I got the cork board from Daiso, attached a piece of black cardstock on it with the double sided tape and that's it!

I will post the tutorial on making the signage, later. :)
Till then!
Ta-ta!